How to Tie a Slipknot A Step-by-Step Guide for BeginnersA slipknot is one of the most versatile and useful knots that you can learn. Whether you’re using it for fishing, camping, or securing items, a slipknot is easy to tie and untie. Unlike many knots, a slipknot can be adjusted and released with ease, making it an essential skill for a variety of tasks. In this guide, we’ll walk you through the process of tying a slipknot, explain when and why to use it, and offer tips to ensure you can tie it correctly every time.
What is a Slipknot?
A slipknot is a type of knot that can easily be adjusted or untied by pulling on a free end. It’s designed to form a loop that tightens under pressure but can be loosened with a simple pull. Slipknots are often used in situations where you need a temporary, adjustable, or releasable loop, such as in fishing lines, securing tarps, or as part of various knots used in crafts and climbing.
Why Use a Slipknot?
Slipknots are highly beneficial for several reasons
-
Adjustability The size of the loop can be easily adjusted by pulling on the rope or cord.
-
Quick Release The knot can be easily undone by pulling the free end, which is useful in time-sensitive situations.
-
Security When pressure is applied, the slipknot tightens, making it secure and reliable for various uses.
Now that you understand what a slipknot is and why it’s so useful, let’s dive into how to tie one.
Materials You’ll Need
To tie a slipknot, you only need a length of rope, cord, or string. The type of material you choose depends on the task at hand, whether it’s thick rope for climbing or a simple string for crafting.
Step 1 Make a Loop
Begin by holding the rope in your hands and forming a loop. To do this, take one end of the rope and lay it over the rest of the rope, creating an X shape.
- Hold the rope firmly where the X forms. This will be the beginning of your slipknot.
At this stage, the loop you make should be large enough to accommodate whatever you intend to pass through it, whether it’s a stick, a post, or another rope.
Step 2 Create the Bight
Next, take the free end of the rope and form a second smaller loop, also known as a bight. This loop will be passed through the larger loop you made in the first step.
- Hold the bight with your thumb and forefinger.
It’s essential to hold the bight firmly so that the next step is smooth and controlled.
Step 3 Pass the Bight Through the Loop
Now, take the bight and pass it through the larger loop that you created in Step 1. This is where the magic of the slipknot happens.
-
Pull the bight through the larger loop and pull it tight.
-
This action forms the slipknot.
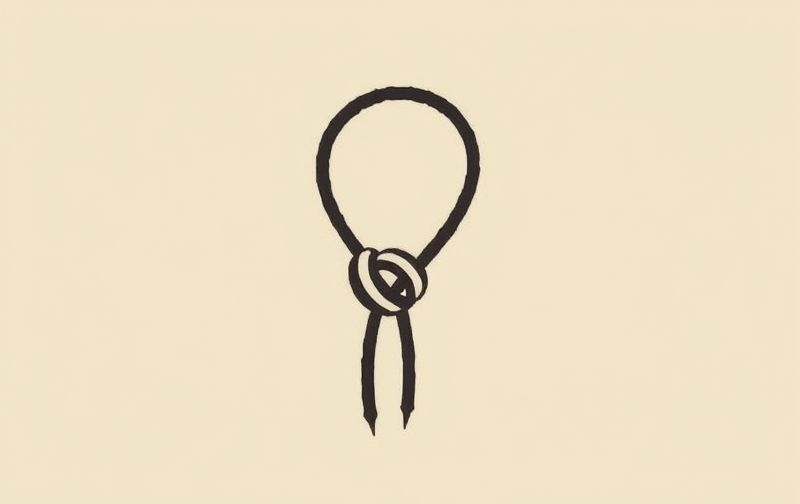
At this point, you should see a small loop that can easily slide along the rope. This loop will tighten when pressure is applied and loosen when the free end is pulled.
Step 4 Tighten the Knot
To secure the knot, pull on the long end of the rope while holding the small loop you created. The slipknot should tighten around the rope or whatever you’re securing it to.
- Keep a firm grip on both the free end and the loop to prevent the knot from slipping before it’s tightened properly.
Once the knot is tightened, you will see that the slipknot forms a firm loop that stays in place until you pull on the free end to release it.
Step 5 Test the Knot
Before using the slipknot in a practical situation, it’s important to test it. Apply gentle pressure to the loop to ensure that the knot tightens under tension. Once you release the pressure, the knot should come undone with a quick pull on the free end.
- If the knot does not release or tighten as expected, adjust the bight or re-tie the knot from the beginning.
Common Uses of a Slipknot
The slipknot is widely used in various activities due to its versatility and adjustability. Here are some common uses
1. Fishing
In fishing, a slipknot can be used to attach hooks or lures to the fishing line. The knot allows you to easily adjust the size of the loop depending on the size of the hook and can be released quickly when necessary.
2. Climbing and Mountaineering
In climbing, the slipknot can be used to tie ropes around anchors, carabiners, or other climbing equipment. It is also useful for tying and adjusting ropes quickly.
3. Crafting and Knitting
In crafting, slipknots are used to create adjustable loops for starting projects like crocheting or knitting. It is commonly the first knot tied when beginning a crochet project.
4. Securing Tarps or Tent Lines
Slipknots are ideal for securing tarp corners or tent guy lines. The ability to adjust the knot’s loop makes it easy to secure tents in windy conditions.
5. General Household Use
From hanging clotheslines to tying down packages, the slipknot is also useful around the house. Its ability to hold items securely and be released easily makes it an essential household knot.
Tips for Tying a Slipknot
While the slipknot is relatively simple to tie, there are a few things to keep in mind to ensure that you do it correctly every time
-
Practice The more you practice tying a slipknot, the quicker and smoother it will become. Practice with different materials like string, rope, or cord to get a feel for how the knot works.
-
Check for Fraying Before tying a slipknot, make sure your rope or cord is in good condition. Frayed edges can make the knot unstable and difficult to tie.
-
Use the Right Size Loop When tying a slipknot, ensure the loop is not too large or too small for the task at hand. A properly sized loop ensures the knot will work effectively.
Common Mistakes to Avoid
While tying a slipknot is simple, there are a few mistakes beginners often make
-
Not Passing the Bight Through the Loop Properly If you don’t pass the bight through the loop correctly, the knot won’t form properly. Make sure you’re threading the bight through the right spot.
-
Not Tightening the Knot Enough If you don’t tighten the knot fully, it may slip or come undone when pressure is applied.
-
Using the Wrong Type of Rope Certain ropes are better suited for slipknots than others. Make sure the rope you use is appropriate for the task and won’t slip or unravel easily.
The slipknot is a simple yet powerful knot that is useful in many situations. Whether you’re securing a fishing line, tying a bundle of cables, or making a temporary loop for any other purpose, learning how to tie a slipknot is an essential skill. By following the steps outlined above and practicing the technique, you’ll be able to tie a secure and reliable slipknot in no time. With its adjustability, security, and ease of release, the slipknot is a must-have knot for any outdoor enthusiast, DIYer, or craftsperson.